Job’s Tears (coix lacryma jobi) are seeds that I grow
in my garden to use in my beaded jewelry designs.
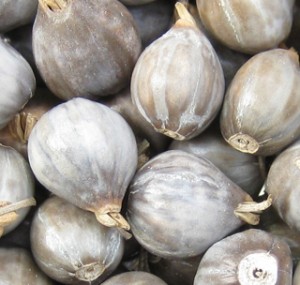 They are tear-shaped (surprise!) and a lovely, variegated gray color. Job’s tears grow all ready to use as a bead with a hole through the middle and a hard, shiny coating. I’ve purchased Job’s tears from a bead supplier and they were terrible! All white, cracking, and even the shape was substandard compared to the job’s tears I’ve grown in my own garden. Like with so many things, there’s nothing like home grown, and once you hold your first handful of home-grown job’s tears seeds, you’ll never go back.
Buy Job’s Tears Seeds Here.
(For Beading or Growing!)
Job tears are the seeds of a grain plant, much like a small, skinny corn, or a really robust rye. A drought-resistant grass needing little in the way of nutrients. The Seed Saver’s Exchange description of Job Tears:
“(Coix lacryma-jobi) Used for beads since at least 2,000 B.C. Once an important source of food, most likely originating in India. When the polished grain-like seeds are mature, there is a perfect hole through the middle, literally nature’s perfect bead. Used for making rosaries and for musical African shaker gourds. Prolific grain-like plants. Annual, 30-36″ tall.”
Job’s tears are what started this whole
handmade jewelry adventure for me!
When I saw their description in the seed catalog, I couldn’t resist trying to grow them. To my surprise, the job’s tears were easy to grow and I ended up with a whole tin full of beautiful, natural job’s tears beads, but I didn’t know what to do with them. I made one job’s tears necklace, but because the seeds were so light, the heavy clasp kept coming around to the front, so they sat in my basement, adored, but unused for 3 years. Then in July of 2009, my parents were in town for their annual 4th of July visit and (as usual), my mom wanted to stop at a craft store. While I was waiting, I was thinking about those Job’s Tears seeds and walking up and down the beading aisle trying to decide what might look good with them. I bought an unakite pendant, some unakite chips, some wood beads and shell beads and took them home. I made one necklace f job’s tears, wood, unakite and shell that I really liked. My mom liked it so much, she had me make a job’s tears necklace for her, too. I had a few materials left over so I just tried to come up with as many different designs as I could until I ran out. Well, I was hooked! I had more job’s tears in my tin, so I went out and bought more gemstone and wood to go with them!! I had begun making jewelry and couldn’t stop, so I figured that I’d better start selling them before we ended up drowning in them, and it’s been a fantastic merry-go-round of design, color, textures and beauty ever since.
Job tears are surprisingly easy to grow.
I found that it’s best not to grow job tears in a fertile vegetable garden space, and that they don’t need very much water or looking after. I’ve written up what I’ve learned about growing job tears in my gardening adventures, so if you want to join in the fun and try growing some job tears of your own:
How to Grow Job’s Tears Beads
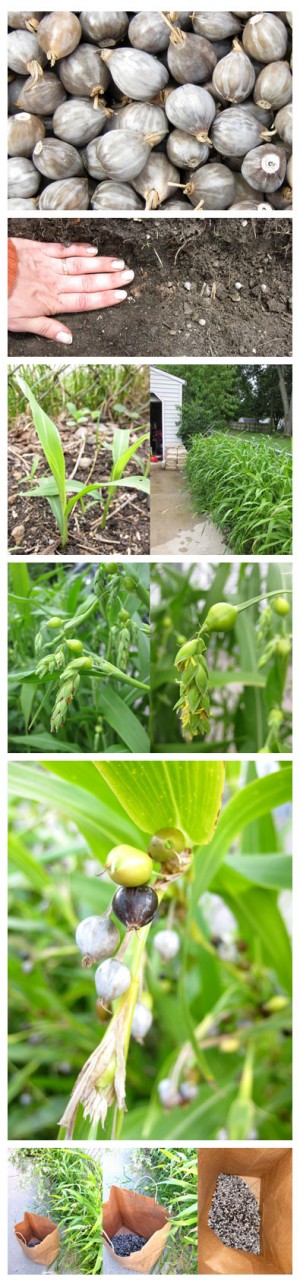
- Choose a site that receives full sun and is well-drained and moderately fertile. As you can see, I planted them in a little strip right next to my driveway. Jobs tears are very drought tolerant, and don’t need rich ground or fertilizer. Even during our scorching Wisconsin summers, I only needed to water these plants a few times once they were established.
- Plant seeds outdoors in the spring, at about the same time as corn is planted, one week or so after the last frost date in your area.
- Make a furrow and sow seeds1/2 an inch to 1 inch deep and about 2 inches apart. You want the seeds to be covered with about 2-3 times their own width of soil. Patting down the soil with your hand or a light tap of the foot will increase chances of good germination. I like to make sure that the little row they’re planted in is depressed a little from the surrounding soil so that when watering, the water stays where the seeds are where it can do the most good.
- Water seeds every other day or so until they germinate and sprout their first leaves.
- Once plants are established be sure to keep them weeded.You can wait until the plants ask for water until giving it to them. You’ll notice that the corn-like leaves will stand up straight and start to get spiky and dry-looking at their tips. This is a sign that you should give the plants a deep watering.
- Begin harvesting as soon as seeds turn black.Pick all black or gray seeds into a paper bag (so they can dry out while in storage), and continue picking every so often through the end of the growing season. The plants will keep producing seeds until frost threatens. Then I’ll go ahead and pull up the whole plants and hang them upside down in the garage so they have a little extra warm-time to ripen some seeds during. It’s good to hang up the bag that you harvested the seeds into somewhere inside, so they get a chance to dry out well. All the seeds will eventually turn a beautiful, variegated grey color as they dry.
- To use as beads, all you have to do is poke a needle with beading thread (I like to use silk beading cord) through the already hollow center. The beads grow with a lovely shiny coating, completely ready to use in your beaded designs. Here’s a video I made that will teach you how to hand knot a necklace, if you’re interested in trying that. I find that since these seeds are so light, it’s best to incorporate some heavier stones in the design to keep the clasp from coming around to the front of the necklace when you wear it (and it makes the necklaces more colorful!) Here are some Job’s tears seeds I’ve got for sale! (High quality seeds that are suitable for growing or for beading.)